OK I decided to write a small post about that part where we create the vertices, UV coordinates etc in the previous post.
I’ll try to make it clear for the people who’re new in 3D stuff.
So yeah, we created a hexagon in our previous post, by creating every vertex and triangle by hand, instead of using a pre-build 3D model. For the simplicity, I’ll do a basic version of our hex this time and create only the top face of the hexagon. If you remember the previous post, it had a height, sides and a bottom etc.
Anyway, first have a look at this;
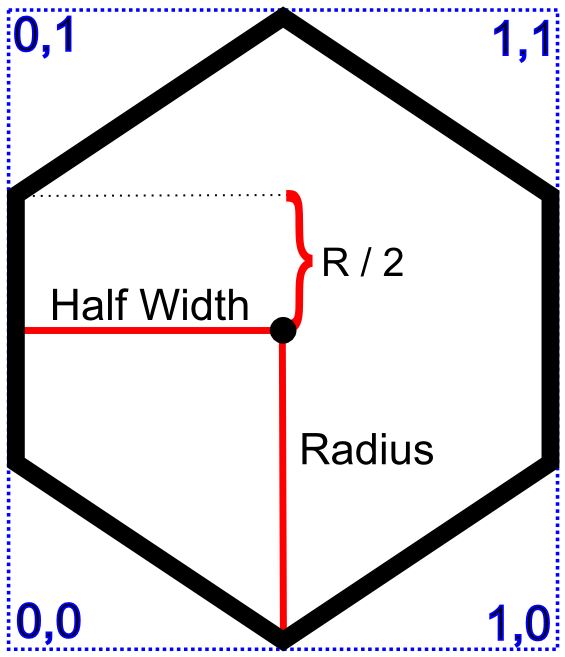
Our hex has a radius of r, this is the distance from the center to any corner. In a standard hex, this is also equals to the edge length. And we have “Half Width”, well it’s the width divided by two really. Nothing fancy.
Remember that we’ll be using center of the hexagon as origin for creating the vertices. So for example, the coordinates for the top corner should be; ( 0, -R ).
UV mapping is a little bit different though. First of all, origin for UV mapping is always bottom left corner, this is fixed and you really can’t change it. Also the width and height of the UV map is scaled down to 1 ( see blue coordinates in the picture ). So again, UV coordinates for the top corner should be; ( 0.5, 1 ).
Let’s have a look at the function;
Vertices[0] =new Vector3(0, 0, –Globals.Radius);
UV[0] =new Vector2(0.5f, 1);
//topright
Vertices[1] =new Vector3(Globals.HalfWidth, 0, –Globals.Radius /2);
UV[1] =new Vector2(1, 0.75f);
//bottomright
Vertices[2] =new Vector3(Globals.HalfWidth, 0, Globals.Radius /2);
UV[2] =new Vector2(1, 0.25f);
//bottom
Vertices[3] =new Vector3(0, 0, Globals.Radius);
UV[3] =new Vector2(0.5f, 0);
//bottomleft
Vertices[4] =new Vector3(–Globals.HalfWidth, 0, Globals.Radius /2);
UV[4] =new Vector2(0, 0.25f);
//topleft
Vertices[5] =new Vector3(–Globals.HalfWidth, 0, –Globals.Radius /2);
UV[5] =new Vector2(0, 0.75f);
Array indexing for these stuff is actually important so be careful with that. Other than that, yea I guess that’s all for this one right?
So now we have bunch of vertices in the space but that doesn’t mean much in a 3D world. To create something visible, we need surfaces and for that we need triangles. Next thing we need to do is to set the triangle information, in other words, let the system know which 3 vertices will be used for a triangle.
Now check this out;
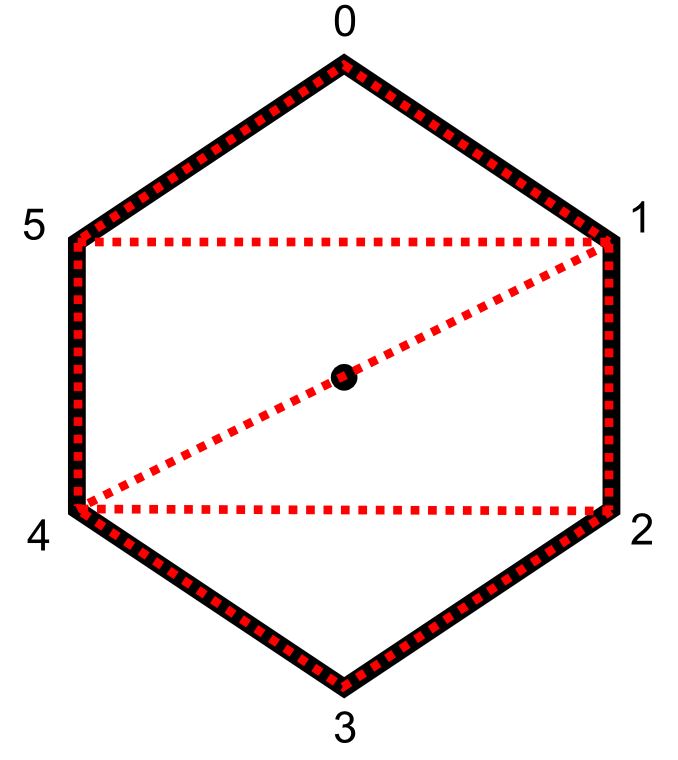
Notice that numbers right by the corners are the index numbers of vertices in the Vertices array. So now we divided our hexagon into 4 triangles and all we have to do is;
2f3″>};
{
1, 0, 5, 2, 4, 3, 2, 1, 4, 1, 5, 4
};
This array will take integer three by three and generate triangles out of them. So 1,0,5 will be our first triangle, 2,4,3 will be the second etc.
Important thing to note here is that, order of the vertices do matter. In our situation, we ordered them counter clockwise so the surface will be above ( it’s all one sided ). If we had them clockwise, surface would have been below. So if you want to turn it over, you can just change the order of vertices, ie 1,0,5 to 1,5,0.
There is one more little thing in the code I posted earlier; Normals.
Normals aren’t always necessary ( depending on the shader ) but it’s good to know really. They are small vectors, showing UP for every single vertex. Yea, Up as in the opposite of down. Normals are used for lighting calculations so pretty damn important as well. For this example though, our normals array will be extremely simple as our shape is simple itself. It’s a simple surface so we can just set all vertex normals to 0,1,0 ( world up in my sample ).
22282a;color:#ffcd22
{
new Vector3(0, 1, 0),
new Vector3(0, 1, 0),
new Vector3(0, 1, 0),
new Vector3(0, 1, 0),
new Vector3(0, 1, 0),
new Vector3(0, 1, 0)
Again the indexes should be in sync with other array indexes, so first vector3 is the normal for vertex 0 etc.
Aaaand that should be it. You can find the whole sample code in the previous post.
Let me know if you have any question, liked the post or wanted to say hi.
I had to close the comments due to increasing spams but you sure can always mail me for anything; brnkahyaoglu@gmail.com
See you later everyone!